Thursday, March 31, 2011

Thrift store chair redo

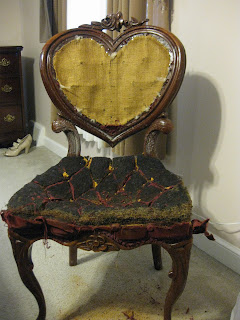
I found this chair at a thrift store and fell in love as soon as I saw it.... and fell even more in love at the price it was, get this...two dollars!!     Yes I'll take that thankyouverymuch.


I loved the rose detail at the top and the curved legs.....  ooo I just love it :)

Okay I'll admit it definitely needed a little help, but had great Victorian bones and it matched the look and wood color of my bedroom.   It just needed new fabric.... easy right?  
 Oh my gosh this turned out to be a messy job....
there were like a million little nails holding all that burgundy fabric onto the chair AND under the seat cushion there was some orangy red sand stuff that poured out as I was pulling that section off.... 


  can you see all that stuff on the floor?   All I can say is ewww.    Thankfully the shopvac swept all that yuck right up.    I know the chair really looks worse now, but I promise you, It DOES get better.
And then I got my DH to make it a little piece of wood for the seat so the new padding would stay put instead of sinking through.
Beautiful!
now for the fabric.....  there was a lot of  measuring, cutting, gluing and stapling going on.
But the end result is just beautiful and makes me smile


and here it is in the corner of my bedroom....   
This was so worth my time and two dollars :)
Hope you enjoyed this and maybe inspired you to just....   go ahead try it. 

Have a great day
Debby

Wednesday, March 30, 2011

My Favorite Necklace

I love to wear jewelry, it always seems to add just the right touch of color or style to an outfit. I just can't always find jewelry I like.   I go for the low priced...  is it called costume jewelry?   But anyway, I started making my own jewelry ( you should see what a collection of beads I have right now..... )  and I made this necklace with a pearly looking flower clasp and some different colored pearls.   So tell me what you think....

I'm hoping to open my Etsy store soon, and I want this to  be my first item on sale    I just need your expert opinion....


Is this something you would wear?   If so, what would you wear it with?   Is it casual, dressy or both?


Just leave your opinion in a comment....
thanks for stopping by!
Debby

Monday, March 28, 2011

Infinity Scarf Tutorial

Hello, happy monday everyone:)
Today I want to share how to make my favorite scarf.   I'm very petite so  those real long scarves tend to swallow me up, so I make my scarves kinda short so I can just wrap them around once and they sit high on my chest.

I'll be honest each time I've made this, I had to do it over two times because it just takes me a minute for it to make sense and then voila!  my scarf is done :)   It has only taken me about 20 minutes or so even after redoing twice.

I bought 1 yard of fabric at Joanns  from the sale rack, still cost me $9.00, .  but  I only needed  1/3 of it to make this.....so I will have some leftover for something else. I guess we'll see about that some other time.


So I layed out my fabric and folded over the longer end so it would be  57 inches long and about 9 inches wide.   you can make it whatever size you want, but this works for me.

 and pinned it along the edge where I would cut it.  Because of the lines in  the fabric it was easy to get it even.   Then I pinned it like crazy so it wouldn't move.  Those lines had to stay lined up or my scarf would look ridiculous.

then I cut along the edge where the pins are, so I only had to sew one side seam.
and then it looked like this:
then folding it so right sides are together you sew a seam right along the raw edge leaving about 2 inches open at each end, It's  very important that you leave this because this is where you will sew the ends together to make it a full circle.
(I used a serger on my seam, but you can just sew it with a regular machine with a 1/4 inch seam allowance....   that would work fine too)
Now you should have a tube with both ends open.
 now turn the fabric so right sides are out
Now this is the tricky part.... the part that I usually have to do twice.   I hope you get it on the first try.
Start your seam at the point shown below....   (the inside corners of each end.)
 
and sew to the end.  Start out slow because at this point you are kinda sewing in a circle.
.
then when you are finished you should have your tube with an opening on the side 
that I just fold under and hand sew closed with a whip stitch
and you are done!


This is my finished scarf:
I also made this scarf out of stretchy knit and I love this one too.
when I wear it I sometimes add the red fabric flower.


If you have any questions or something doesn't make sense.... just let me know and I'll do my best to explain.


 Have a great day!!
Debby


Saturday, March 26, 2011

Something I love Saturday

I know this is totally off the subject, but I tend to type the way I think so I just feel the need  to mention that ever since it officially became SPRING, the weather here has been freezing!! Oh my gosh I just want to wear some cute spring clothes!  I am so done with Mr. Winter!   Annnddd now that I got that off my chest,  we will be moving on ....     

Saturday is the day I will share something I love.   It could be anything I happen to see, find on the web, or just maybe my favorite dinner.
Today I want to share this awesome tutorial for a  bubble chandelier.  I have been obsessed with chandeliers lately and I was searching for a nice DIY tutorial that I might try someday.... and I found this:
http://www.casasugar.com/DIY-Bubble-Chandelier-8478784  .... and I fell in love. Problem....  I don't have anywhere to put something like this :(  
Would it be wrong to open a little shop just so I can have a bubble chandelier??

Wednesday, March 23, 2011

Cute Chest Redo

I bought this shapely little chest at a yard sale for the extra bedroom I have for when the little kiddies come over.
  It was $5 and cute......except it was all these bright colors.   Bright colors are fine and good, but totally did not match the room I wanted to put it in.

  Needless to say it sat in a corner until now. Since I don't have a  before picture  =(   this shoe box is the exact colors... 

 So let's paint it       Brilliant right?     I tried sanding and I was getting colored sawdust everywhere.   ewww . so frustrating! so I skipped that step.....   bad idea.   I did like 5 coats of primer and just as many coats of the finish paint to cover those bright colors with my ivory colored paint.
 An idea for a little "character" started to form.   I went through my scrapbook papers and found a tan color , cut it to 8" x 11"  so it would fit in my inkjet printer. Then I found the love definition in my computer dictionary,  copied it into wordperfect and printed it right onto the tan paper. I wanted this to be my drawer front.  laid the drawers on the wrong side of the paper and cut out the exact shape.....    are you still with me here?    I know this would be so much easier to understand with pictures but I was so busy getting it done I forgot.   sorry.
I used a little mod podge to glue them on the drawer fronts, it was starting to look really good now. All I needed was a little grayish paint to give it an old look, but I only had these colors.... 


so I used them all!     Mix em all up and you get a nice gray color...

just kinda dry brushed the edges and here and there did a few more coats of mod podge and 
DONE! 

Here is a closeup of the drawers
 and here is my shapely little chest in its spot with the monkeys


So there you have Wednesday's "finished" project  
think I'm gonna share it with Sew Much Ado    We Did It! Wednesday

Have a great day!
Debby =)


Tuesday, March 22, 2011

First Wedding of 2011

ok so I haven't mentioned to you yet that I am a floral designer and besides working in a flower shop two days a week, I also do small weddings at home.   Yes it does get a little messy in my kitchen, BUT I always feel like I  accomplished something important when I finish the job and the Bride loves everything.  So I have a wedding coming up in May, the 14th to be exact.   It's such a fun wedding, the dress colors are sunbeam (shown below) and kelly so it's kind of a lemon lime theme. I have about 10 centerpieces, 3 bouquets and some  boutonnieres. Here are some pictures I have been looking at that are inspiring me:
davidsbridal.com


so bright and happy....     sunbeam is such an appropriate name for this color. 
her centerpieces will be clear cube vases with lemon and lime slices  and some fun yellow gerbera daisies ,
I will be sure to post pictures before I send the flowers off  to the ceremony on the big day.

Wish me luck so that all goes well and the bride loves everything.

Monday, March 21, 2011

Trash to treasure

When I say on a whim that is exactly what I mean.....   I have the shortest attention span ever!  So there is a small chance this blog will be all over the place.   I sometimes don't even finish one craft and I'm super excited about the next thing.....  and eventually I might actually finish something.   lol.    So anyway if you can bear with me and my SAS crafting I would love to share the fun things I HAVE finished.    

So anyways, my sister gave me this sewing table and chair that she found in the trash.  I have to say it wasn't very attractive, but... it had potential.

 and here is the before...


someone was having a little fun.....
                                    
                               
and after LOTs of sanding.....  which I should probably mention it's best to sand pieces like this outside.  I didn't have the patience to wait for warmer weather and well let's just say I cleaned that small room floor to ceiling after I was finished. I know crazy right?  but I actually finished something! Much more important :) 
and here is the after... 


LOVE!!


Linking to 


 so check back soon for some of my other finished crafts.
 have a great day!!
 Debby